Salesforce data plays a major role in the success of any organization, acting as the foundation for customer interactions, business insights, and strategic decisions.
But as data grows, managing, organizing, and navigating it can become overwhelming. That’s where PinTags comes in—a powerful Salesforce app designed to help users organize, tag, and easily access important records across their CRM platform.
In this blog, we’ll walk you through everything you need to know about PinTags, including why it’s a must-have tool and how to access, install, and set it up effectively in your Salesforce environment. Whether you’re a Salesforce admin, developer, or end-user, this guide will equip you with step-by-step instructions to get started.
Introduction To PinTags
PinTags is the best-in-class data classification & management Salesforce application designed to improve how you organize, search, and manage records by allowing you to pin custom tags on any standard or custom Salesforce object.
With PinTags, users can:
- Add personalized tags to records for better classification.
- Search for tagged records effortlessly.
- Filter records based on tags directly within Salesforce.
Why Is PinTags a Must-Have for Salesforce Users?
If you’ve ever struggled to track records, filter data, or communicate record status within your team, PinTags solves those challenges seamlessly. Here’s why it’s a must-have:
Enhanced Organization: Easily categorize and filter records using custom tags.
Faster Record Retrieval: No more endless scrolling—quickly locate tagged records without complex searches.
No-Code Customization: No developer required—easily set up and manage tags through intuitive interfaces.
Improved Collaboration: Sales, support, and marketing teams can stay on the same page by using a shared tagging system across departments.
Boosts Productivity: Reduces time wasted scrolling or searching through lists; empowers quick decision-making.
Flexible and Customizable: Works across any Salesforce object—standard or custom—tailored to your unique workflows.
How To Access PinTags on Salesforce AppExchange
1. Go to AppExchange: Open your browser and visit Salesforce AppExchange
2. Search for PinTags: In the search bar, type “Pin Tags” and press enter.
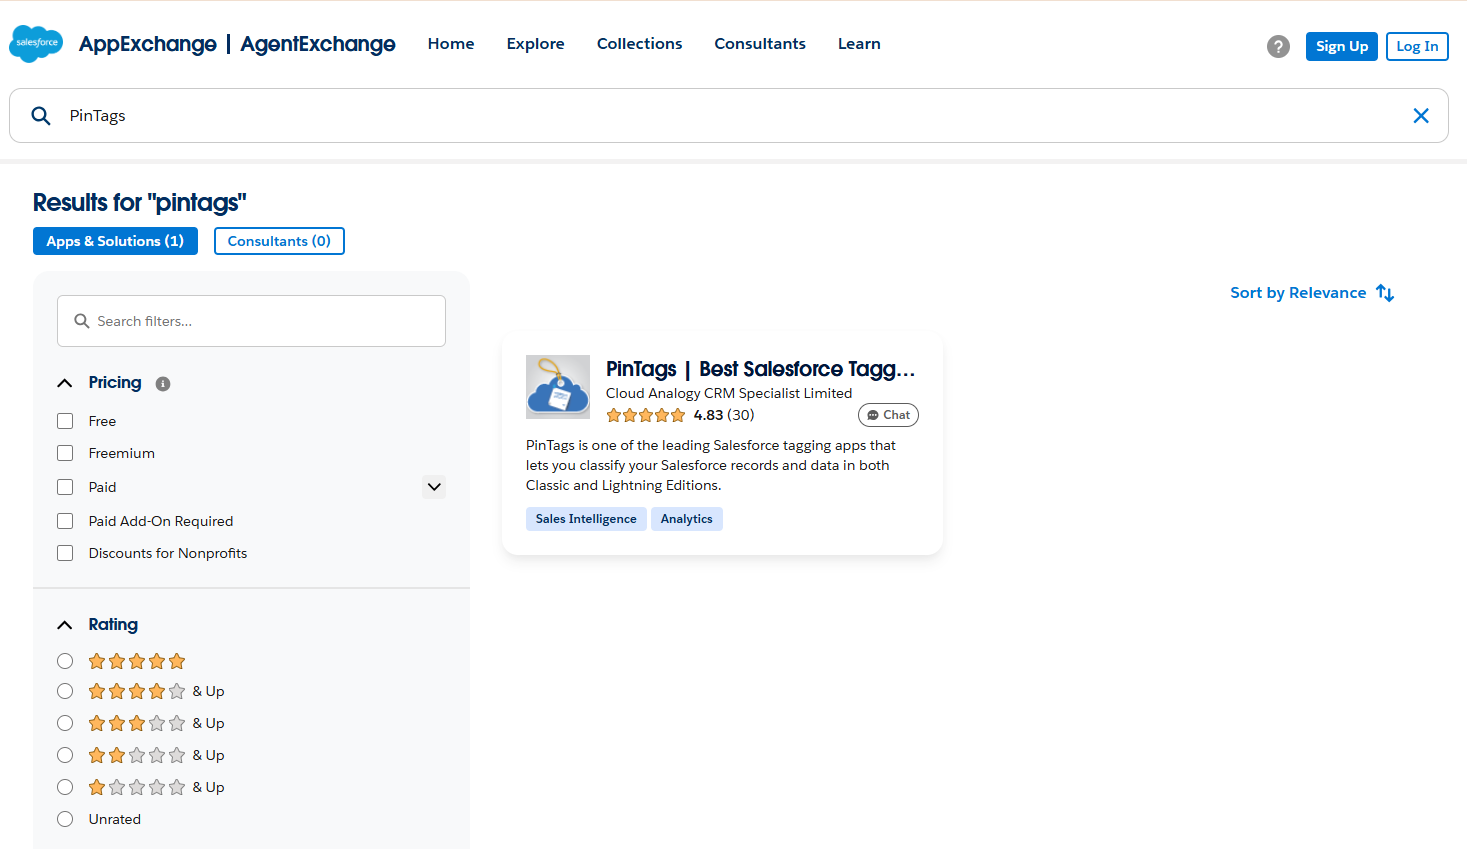
3. Select PinTags App: Locate the PinTags app from the search results and click on it to view the app details.
4. Click “Get It Now”: Once you’ve reviewed the details, click the “Get It Now” button to start the installation process.
How To Install PinTags
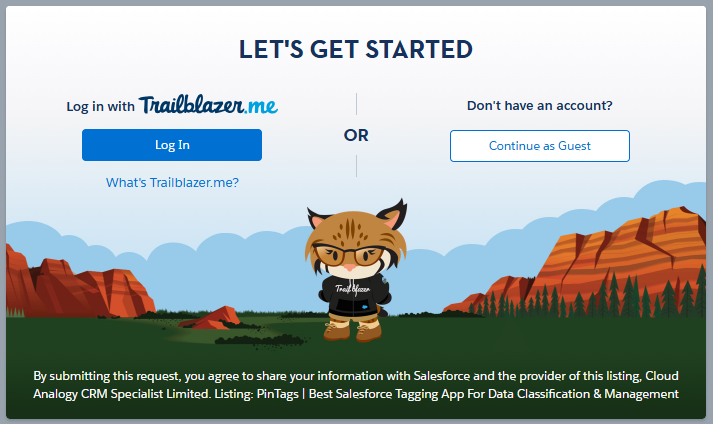
- Log In: After clicking “Get It Now,” choose to log in using your Salesforce credentials.
2. Select Your Salesforce Account: Choose the Salesforce account where you want to install the app. It’s recommended to install in a Production Environment unless you’re testing in a Sandbox.
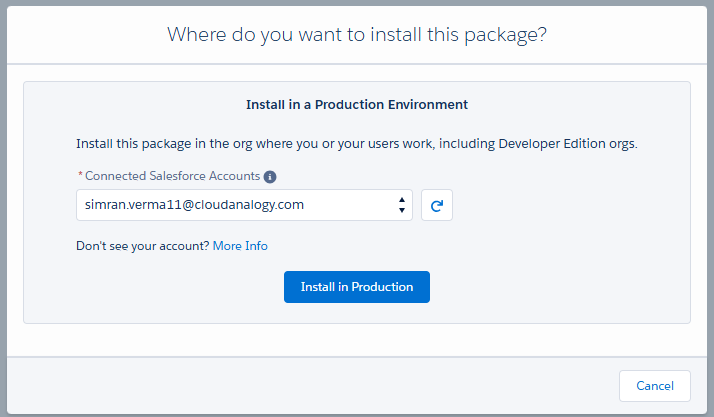
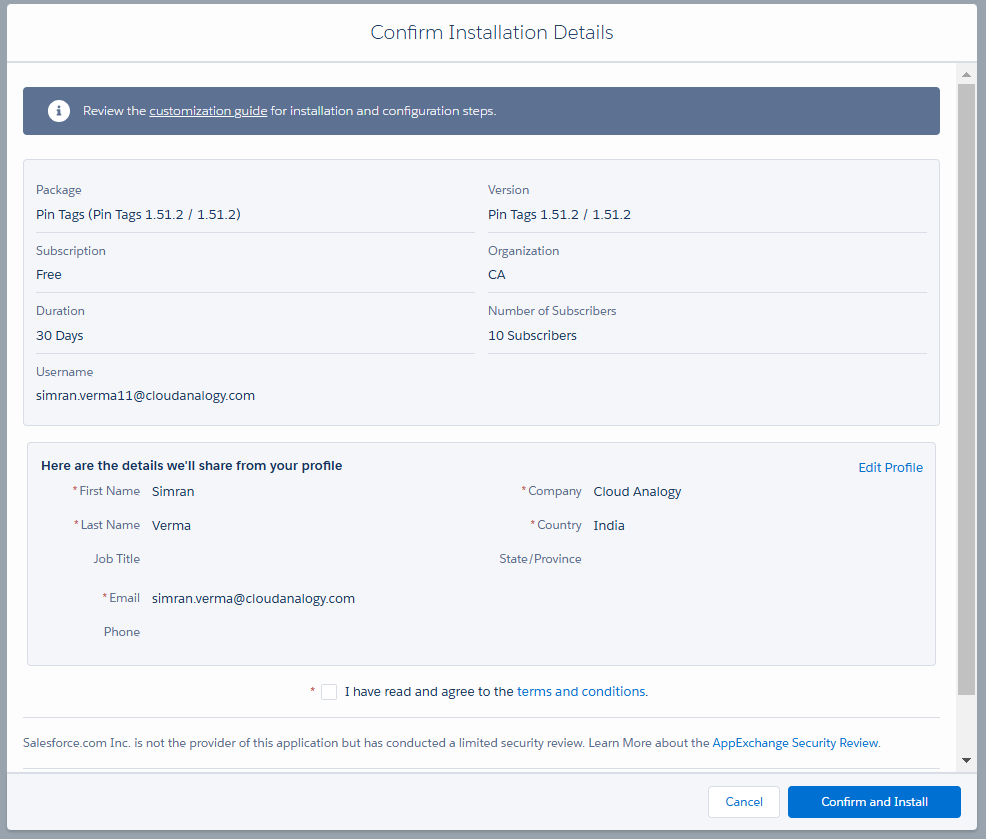
3. Accept Terms and Conditions: Carefully read the terms and conditions. Once you’re satisfied, check the box to accept them, then click “Confirm and Install.”
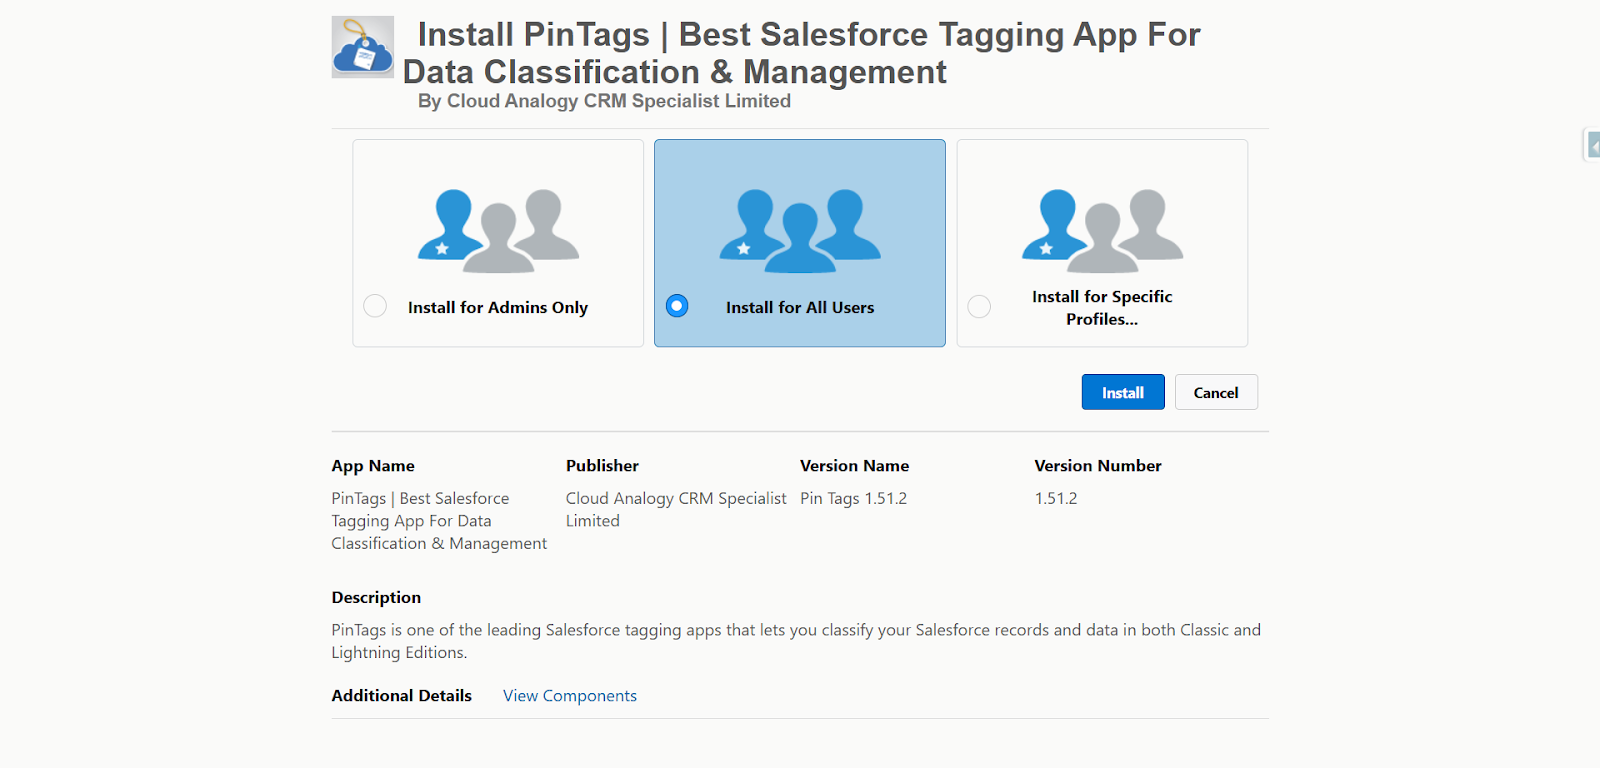
4. Choose Installation Type: Select the installation type based on your business needs—whether it’s Admins Only, All Users, or specific profiles.
5. Click Install: Finally, hit the “Install” button and let Salesforce work its magic.
6. Click Done: Once installed, click “Done” to complete the process.
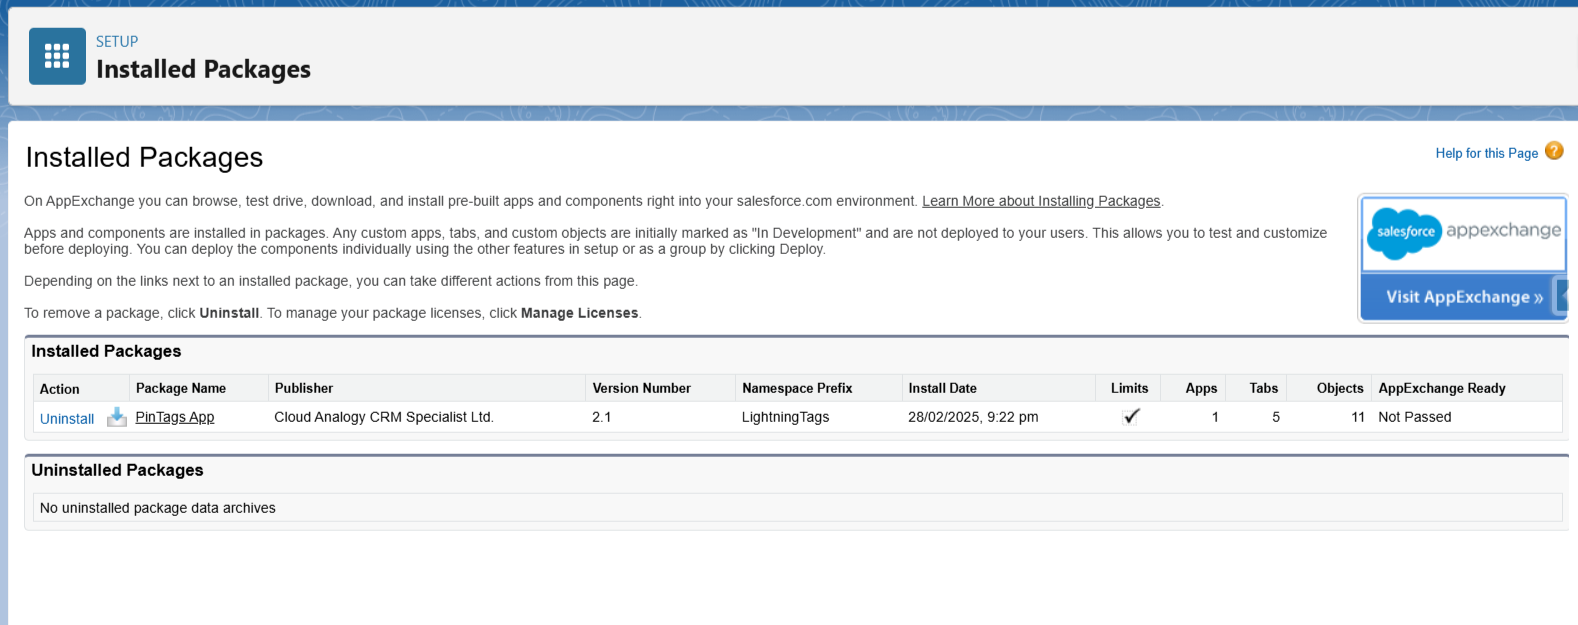
Note: You’ll then be directed to the Installed Packages page inside Salesforce, where you can see PinTags listed among your installed apps.
How To Set Up PinTags
Assign Licenses to Users
To ensure users (besides System Admins) can access PinTags, you’ll need to assign licenses. Here’s how:
- Navigate to Installed Packages: Go to Setup → Installed Packages and locate PinTags.
- Manage Licenses: Click on “Manage Licenses” next to the PinTags app.
- Add Users: Click “Add Users” to see a list of available users in your org.
- Select Users: Choose the users you want to assign the app to from the list.
- Click Add: Once selected, click “Add” to assign the licenses.
Adding PinTags Component to Any Salesforce Object Page
One of the standout features of PinTags is the ability to add its tagging component to any Salesforce object’s record detail page. Here’s how to integrate it:
- Navigate to the object’s tab where you want to add PinTags (e.g., Accounts tab).
- Open a record from that object.
- In the top right corner, click the gear icon (Setup) and select “Edit Page.”
- This opens the Lightning App Builder.
On the left panel:
5. Find PinTags Components under custom components.
6. Drag and drop the PinTags component onto the desired section of the page layout. On the right-hand properties panel, select the name of the component from the dropdown menu.
Important Note for First-Time Installations:
If this is your first time installing PinTags, you’ll need to deploy a domain to enable custom components.
7. After deploying the domain, add the PinTags component again to your object page.
8. If you want multiple tag components, select other components from the right-side dropdown as needed.
9. Click “Save.”
10. Click “Activation” to activate the page for the app users.
In a data-driven world, having a clear, visual, and flexible way to manage your records can make all the difference. PinTags bridges the gap between data complexity and user-friendly organization by introducing intuitive tagging functionality right inside Salesforce.
Whether you’re a sales rep tracking hot leads, a support agent managing open cases, or a manager overseeing critical accounts, PinTags helps you stay organized, focused, and proactive—all without ever leaving the Salesforce platform.
With its simple installation, seamless integration, and easy customization, PinTags is the must-have Salesforce app that transforms the way you work with data.
Ready to get started? Head over to Salesforce AppExchange, install PinTags, and unlock a new level of CRM productivity today!